You have a few options to run a meeting through Zoom. Phone call only (traditional phone only) conference calling or you can do a mix of a phone and PC based conference meeting.
By default when you schedule/run a meeting with Zoom it will allow all audio Options (PC and Telephone). This will allow you to send invites that have all the methods for connecting to a Zoom meeting and let your invitee select the best solution. These meeting connections included PC video/PC audio, PC Video/Telephone Audio, PC Audio Only, or Telephone Audio only, and connecting with a Mobile device audio/video.
For a traditional phone only meeting you will need to modify the meeting when creating it with the scheduling wizard. The section you will modify is “Audio Options.” Select the “Telephone Only” Radio button to force users to Telephone only calling. Keep in mind that if you are doing a telephone only meeting you might want to edit the default invitation, remove the links, and just send the call in Telephone numbers and the meeting id.
In order to schedule this meeting you will open the Zoom Client installed on all MTAS computers. Once the client opens you will need to logon and complete the scheduling wizard. See below if you have never logged on to Zoom before.
How to Logon to Zoom
In order to logon to zoom follow the steps below.
1. Open the zoom client. 
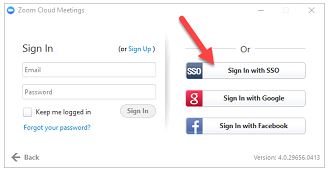
2. If you have not logged in before you will see the following screen first.
a. Click on the “Sign In” Button

3. On the following logon screen Click the “Sign In with SSO” button shown below.
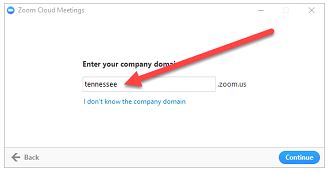
4. The following screen should have “tennessee” in the text box that allows input for your company domain. If it is not in the domain box then you will need to type it in. Then click the Blue “Continue” button.
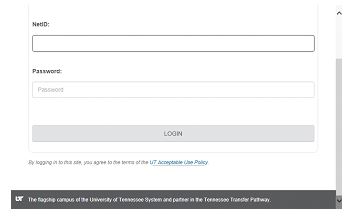
5. The following screen is a redirected netid logon page. You will enter only your NetID and your NETid Password in the appropriate fields.
How to Schedule a Zoom Meeting
1. Click the “Schedule” button in the Zoom client.
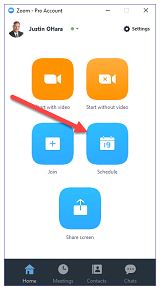
2. This will open the “Schedule a new Meeting” Windows. The “Topic:” line will prefill with a default meeting name. This will also become the Subject for your Outlook Calendar entry and the email invitation. Therefore, you may want to change it to something more meaningful for you and the invitees.
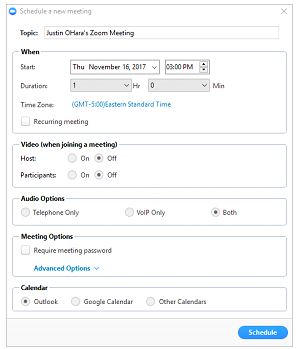
a. “Topic” - Give your meeting a Topic/Name.
b. “When” - Set the meeting start time and the duration. Duration sets an end time in your calendar, it does not shut down the meeting after 1 hour or whatever duration you set.
c. “Video” - Sets how the video behaves for the Host and Participants when you connect to the meeting. “Off” means when you connect to the meeting, you will have to click the Video button to turn on your Video. “On” means that as soon as you connect to the meeting your video will be running. The default setting is “Off”.
d. “Audio Options” - Default is set to “Both” which means that “VoIP” (PC for audio and video) and “Telephone” are audio options for your attendees. If you do not want one or the other then set it to your preferred Audio here.
e. “Meeting Options” - You can require a password for the meeting. If you check this box then you will have to input a password in box that will open. If you use this option and plan to allow people to join by telephone then make the password numerical.
i. “Advanced Options” – Exapand this section to see a few other options for the meeting.
1. “Enable join before host” - Enabled by default this allows your attendees to join the meeting before you as the host. Uncheck this box if you would prefer that no one join the meeting prior to the Host connecting.
2. “Use Personal Meeting ID (your meeting id appears here)” – Each user is assigned a default meeting id that will remain the same. This allows you to share a link or Meeting ID that never changes. You can also customize your PMI once you have been upgraded to a Zoom Pro Account.
3. “Record the meeting automatically on the local computer” – this starts recording the meeting to your local hard drive as soon as you start the meeting.
f. “Calendar” – The default should be Outlook, which should be the one you use. This is what will create the meeting on your calendar in Outlook and also the meeting email for you to send out.